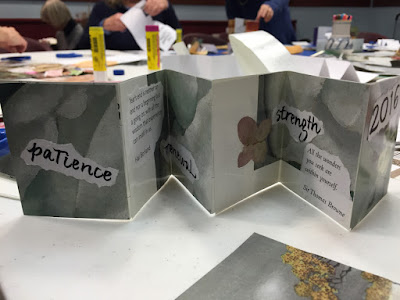
Book Arts Tuesday has been delayed a day because I wanted to share photos and how-to information from last night's New Year Book workshop at the Newburyport Public Library. We used 2015 calendars to say farewell to the old and bring in the new year. The accordion books were what Kojiro Ikegami calls a Double Leaved Album in Japanese Bookbinding. Our books were soft rather than hard cover. All my workshops now fall under the umbrella of what I call "Book-Play." I try to make everything as simple as possible to encourage spontaneity and a playful spirit.
Directions to make a small book from one sheet of paper follow as well as two pdfs that you can download, one with quotes for the new year and one with words I wrote of things we might wish for in the coming year. In the workshop, we made the small sample book and then created books from calendar pages.
DIRECTIONS:
1. Cut the paper so that you have eight pieces of paper. We folded the paper in half and cut it to make two pieces. We put those 2 pieces together, folded them in half the long way, and cut them to make 4 pieces. We folded those 4 pieces in half and cut them to make 8 pieces. You will use 6 or 7 of them.
2. Fold 7 pieces in half. If you used recycled paper with writing on one side, the writing on the outside.
3. Set them up as they will be assembled to make the pages of the book. The two outer pages of the book will be one layer; the rest will be 2 layers and be held together by glue. We used glue sticks.
4. If you have used recycled paper, you will be gluing writing side to writing side. When you start to glue them, you may find yourself getting confused. If you remember that edges always get glued to folds, it will help.
5. When the 5 pieces have all been glued together, it's time to finish the book by making the outer two pages into covers. You can use one of the folded pieces for each end to make a covers with 3 layers of paper.
It will be easiest if you glue the front and back separately rather than cover the whole piece with glue and then try to attach it. I like the thicker cover and it works fine for the sample book. However, you may not like this method when it comes to making a book with calendar pages as the cover will also cover the first page. If that doesn't make sense now, it will when you start to work.
The alternative is to cut one of the folded pieces in half, and glue one layer to reach end to make front and back covers.
Your book can be any length you choose. If you use an odd number of folded sections, you will have a clear front and back cover. We cut our calendar pages to make our book pages the same way as the sample. Cut in half, cut those pieces in half, and continue to we had the sizes we wanted. Some people made smaller books, others larger, some tall, some wide. It was fun to have that variety right from the start. In addition to the calendars, I had on hand papers from my collage box, some dried hydrangea and small greens with packing tape to adhere it, and markers.
You can see more photos from the workshop on flickr.


3 comments:
Well THAT'S rather fabulous! Such beautiful results from what most would just toss in the trash. Thanks for the pdfs.
Thank you for sharing this inspiring calendar project and thank you for the lovely quotes and words!
Thank you SIsa!
Post a Comment